I haven’t written a repair oriented post in quite a while. I figured I’d better document this one while it was still fresh in my mind.
The problem was a Stern CPU board out of a Spiderman that was draining the battery quickly. This era of board is Stern’s SAM system that was used from Pirates of the Caribbean until Wrestlemania, which was the debut of the Spike system.
A quickly draining battery usually involves the board’s clock or RAM. These are what the battery supplies power to when the game is powered off. The area we’re interested in is this section of the CPU board schematics:
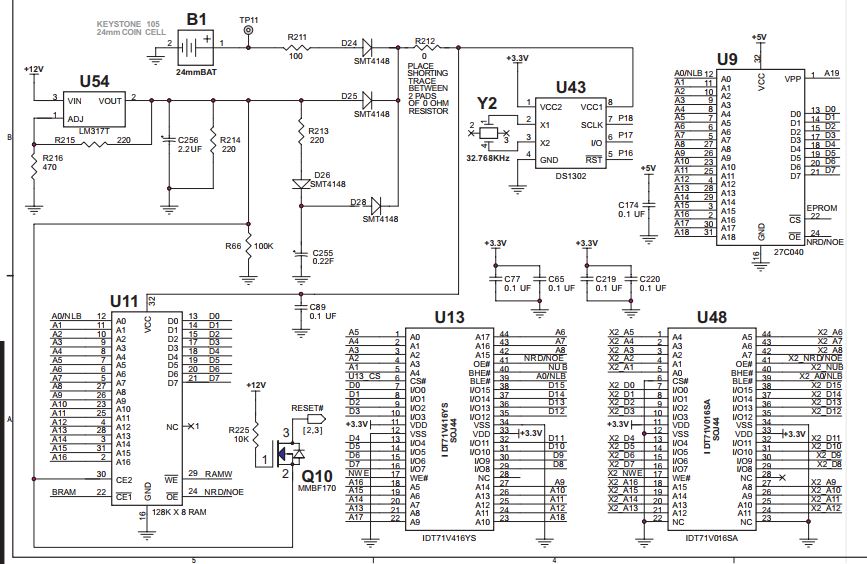
We’re interested in the path from B1 at the upper left to the clock at U43 and the RAM at U11. If you follow the output from the battery you can see it goes through a a couple of resistors and a blocking diode on its way to the clock and RAM. You can check that voltage is getting from the battery to U43 and U11 with a volt meter. With the power off, put the black lead somewhere on ground (a strap, metal portion of the backbox, or ground area of the CPU board) and put the red lead on Test Point 11. You should get around 3v. You can then move the red lead to the legs of R211, D24, and R212. You’ll see a voltage drop across D24 of about 0.6v, this is normal. Continue with the red lead and check Pin 8 of U43 and Pin 32 of the RAM. You should see about 2.4v. Also check both sides of D25. You should see voltage on one side and no voltage on the other. If this all checks good, then your problem isn’t with a component leading up to U43 or U11.
One thing you may not be aware of is Stern games have a clock. Stern games don’t seem to utilize the clock like Williams’ games from the WPC era, so most people don’t bother to set the clock or pay attention to it. But it is there running all the time. When the game is powered off it is running off the battery. You can access and set the clock in the menu under Utilities -> Time.
In this case, when I went to the Time menu to set the clock it would go through the settings and when I made the final change to update the time it would output gibberish as the current time. This lead me to believe something was wrong with the clock chip itself.
I decided my first point of attack would be the clock IC at U43. It is a a surface mount DS1302. It is an SOIC-8 150 mil package. Make sure you get the 150 mil package, not 208 as 208 will be too wide. The part number I found for a replacement is DS1302Z+. I ordered the part from mouser.com.
Don’t get intimidated by surface mount components. If you have a good temperature controlled soldering iron you can work on them at this size. I used Chipquik to remove the clock IC. Chipquik lets you remove components with low heat and minimal risk to the board. A vacuum solder extractor helps remove any left over solder after the chip comes loose.
After replacing the clock chip, all is good. The clock set correctly, keeps time when powered on or off, and the battery no longer drains.